I made a button stick!

Part of what MakerCave is all about is learning and building. I’ve been working on a massive project for a long time, something I’ve wanted and dreamed about for years. And as part of working through a larger project, it can be useful to subdivide the large project into several smaller projects.

To that end, my new button stick!

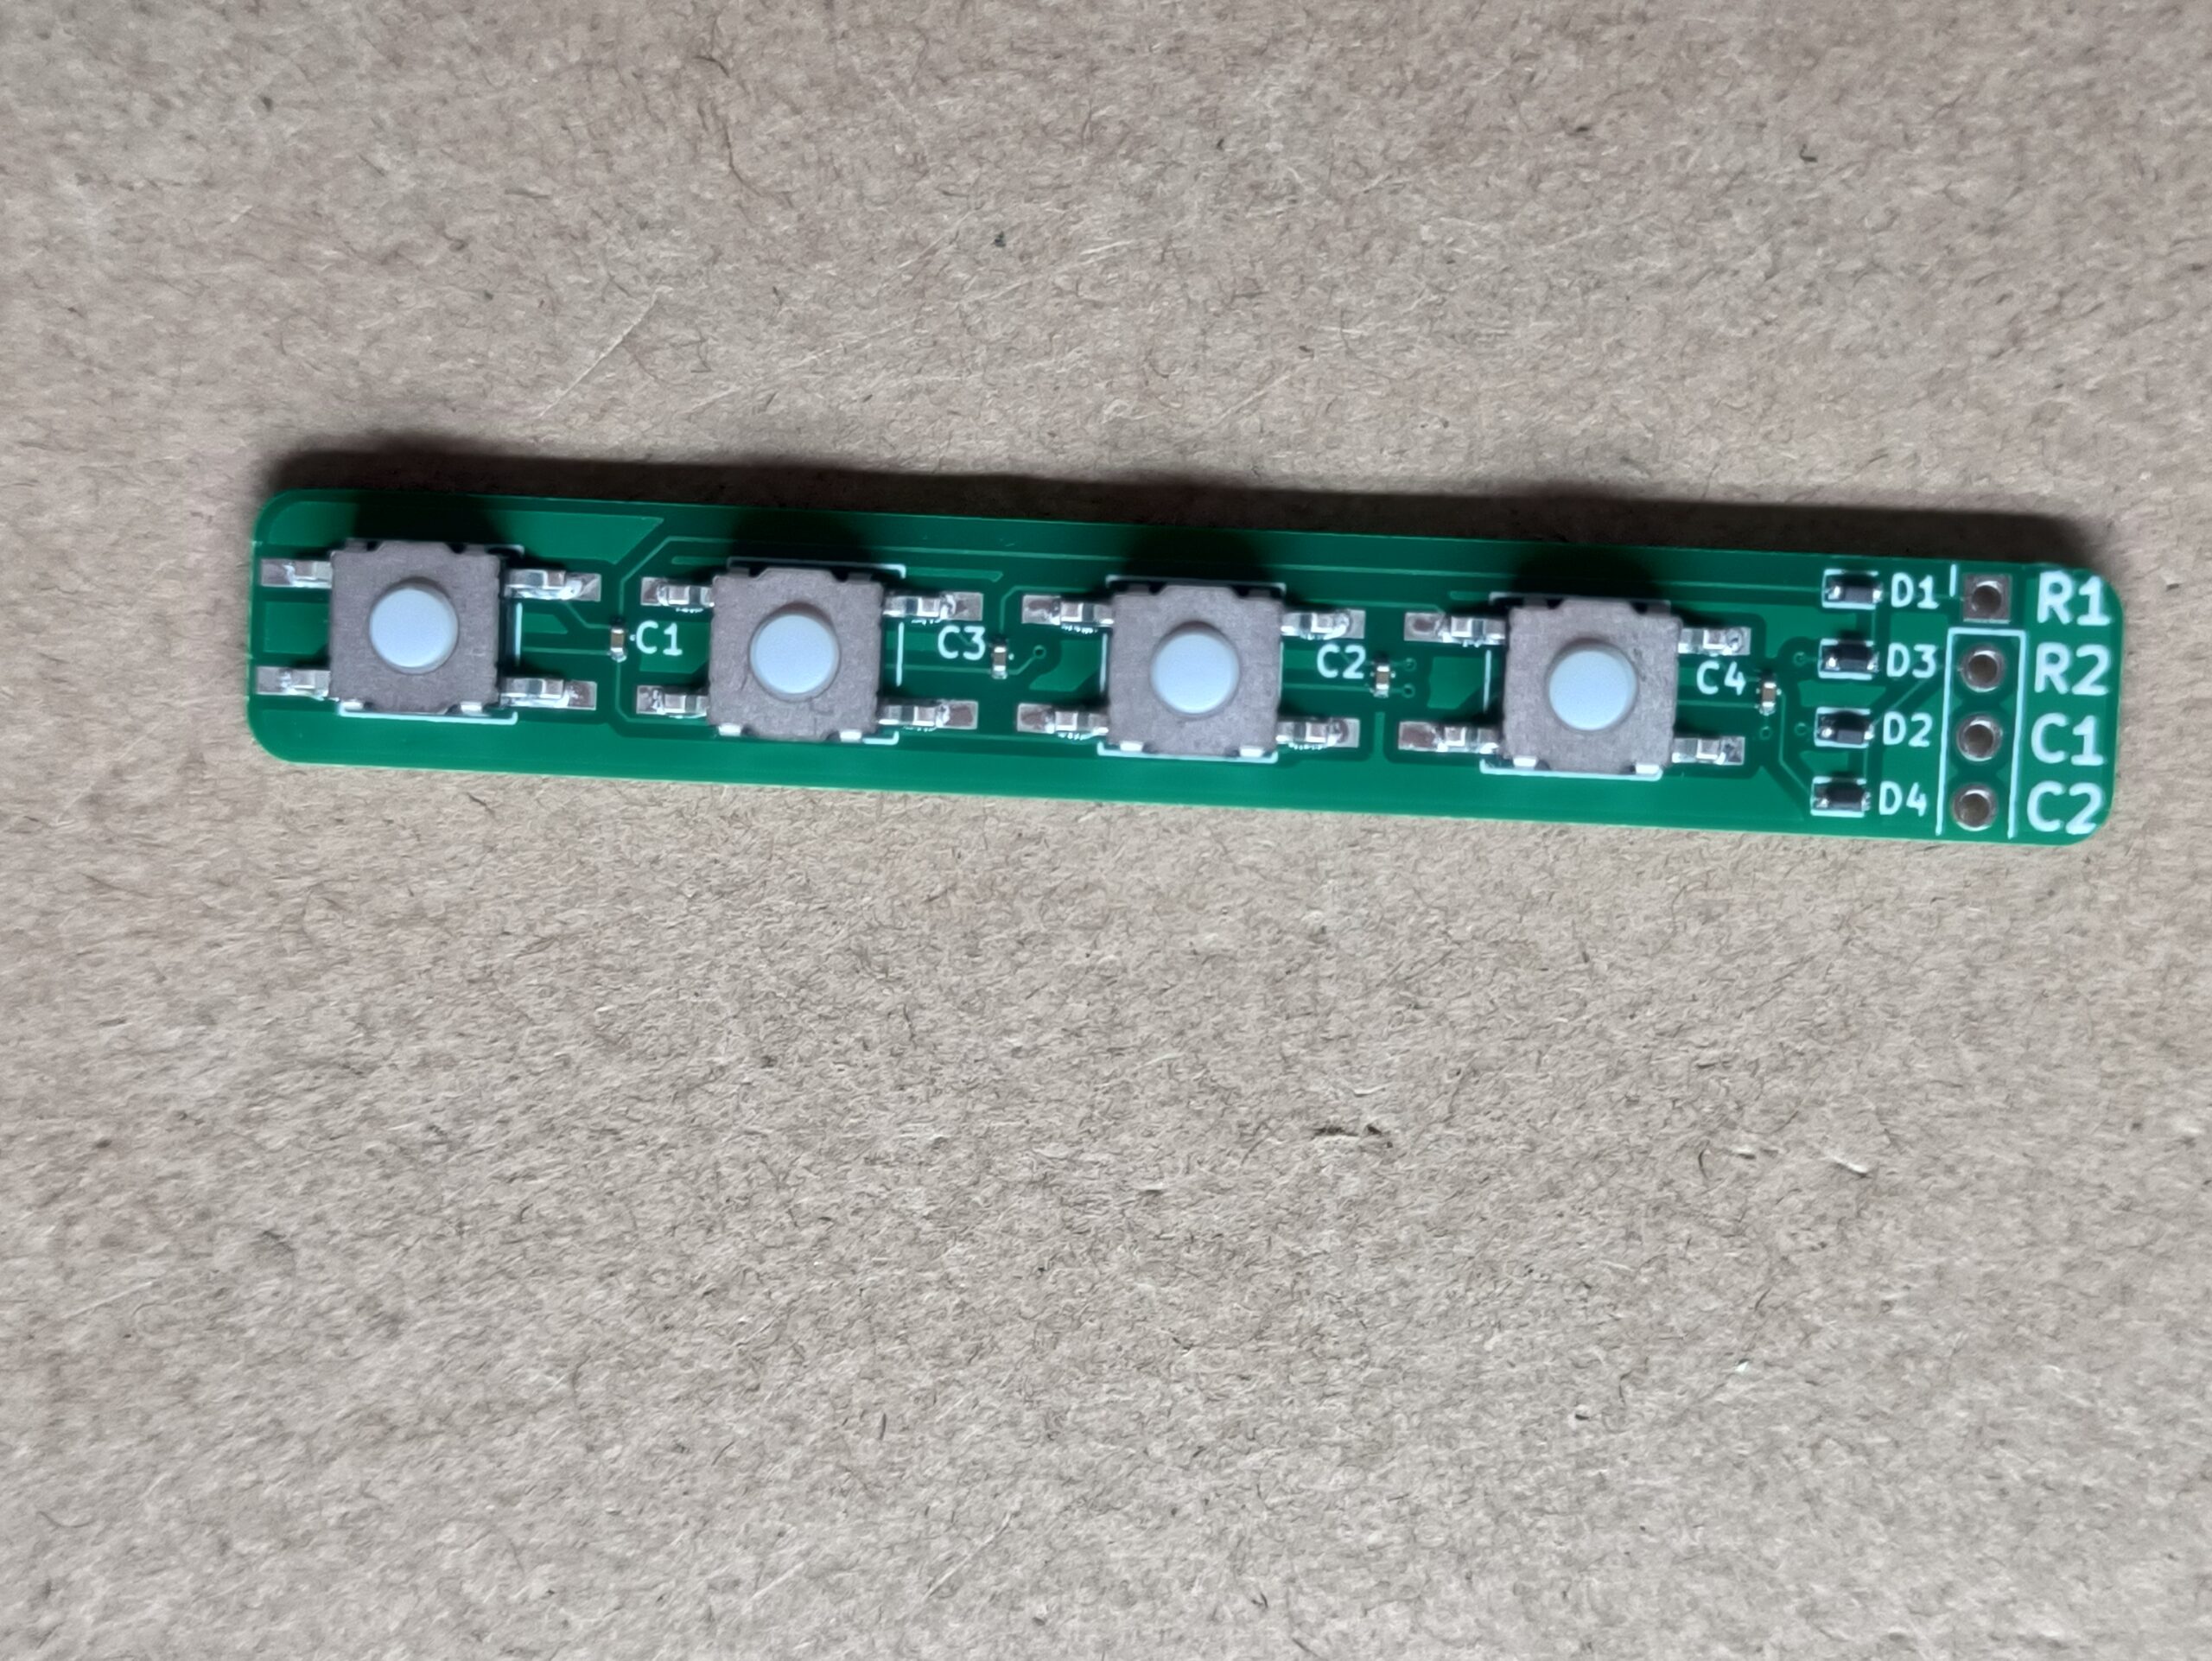
Other buttons matrices exist, but I didn’t like the look of any of them and didn’t think they would be very comfortable to use as a remote control. With this first batch I think the only thing I’d change is I’d get a slightly higher silicon-button part on the buttons in future batches.

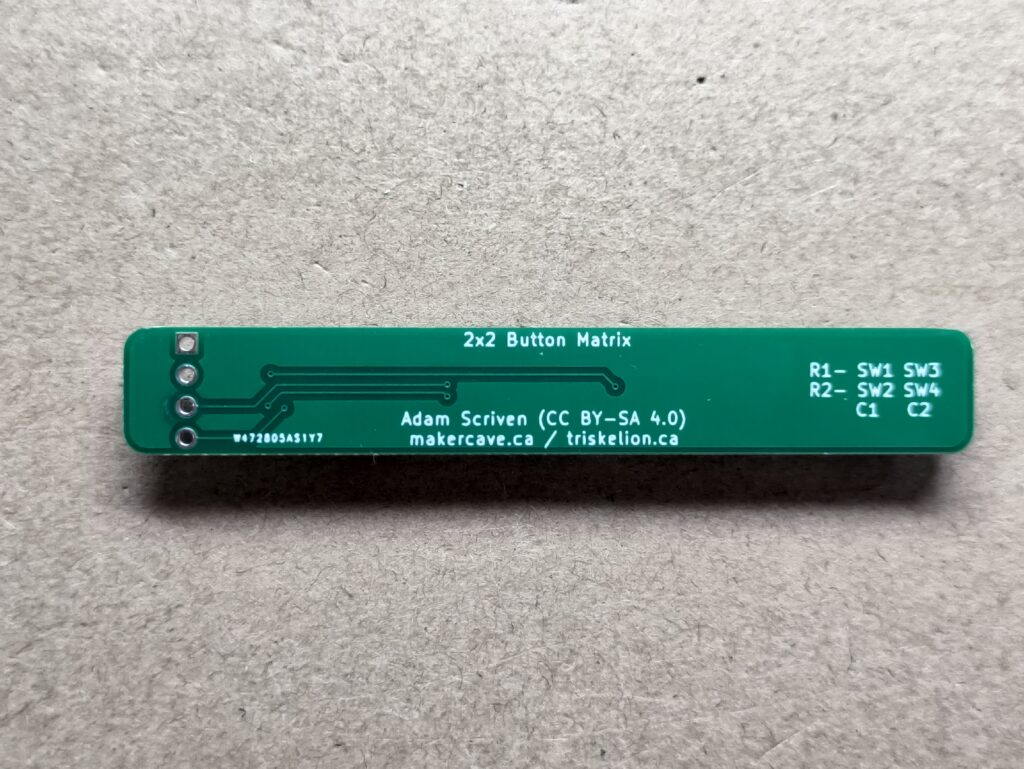
I did lots of reading about keyboard and schematics and stuff before I settled on the schematic I ended up creating. Each button has a small capacitor to boost the power of it’s press, as well as a diode to allow not only clarity but also chording and other advanced programming.

2x2 Button Matrix Schematic
2×2 Button Matrix Schematic

The buttons I chose are water and dust proof to ip67, but as I said the silicon is a bit short and hard to press. I will be doing underwater testing with the boards, they should be waterproof as is, and even if not I have conformal coating I can use if I need to.

This isn’t the first custom PCB that I’ve created, but it is the first that meets the final specifications of this V1 of the larger project that I’m working on. I’ve been using KiCad as well as Fusion 360 for designing.

The code for this project is released on my github at: https://github.com/scriven42/2x2_Button_Matrix

If you want some but for whatever reason won’t be making them yourself, this first batch I ordered from PCBway and have made available on their sharing system:
https://www.pcbway.com/project/shareproject/2x2_Button_Matrix_def44599.html

I have a second batch on the way from Aisler and they also have a sharing system that should make it easier if you would like to order them for your own project:
https://aisler.net/p/VKKEEBOR
[When I receive the Aisler batch, I’ll upload some pictures to this post.]

On Frustration…

Most of the time, blogs talk about the great stuff that’s happening, they tease you with the upcoming fantastic.

But we all know that’s not reality, right? One step forward then two steps back, then a slide sideways down a rabbit hole, then forward again… it’s a dance between the mind, the body, and the external environment. And sometimes we step on our toes.

I’ve been stepping on my toes a lot recently. It’s been very frustrating and anxiety-inducing. Eventually [after more practice and when I have just more “parts” so I don’t feel so stressed about a mistake screwing up the one “widget” that I have on hand], I’m sure this won’t be true, and soldering will basically feel the same as, say, working on a bike.

But today is not that day.

I’ve been working on the base for a project I’ve been dreaming about for most of my life. It requires soldering a 40-pin Raspberry Pi header, a 3.3v power tap from there, a 5V power tap from there, and 3 grounds. As well as other supplemental wiring between USB, AV TRRS, and a “munging” board (Yes, I’m being vague on purpose, there will be more about this exciting project when it’s done).

The first time, it went great! I was ready to start making the supplemental connections when I realized that I had installed it on a Pi3, and the Pi4 has slightly different HAT shape that mine no longer adhered to… back to the drawing board.

The second (over the last few days), I’d finally finished the soldering. There were some curious apparently cross-wirings, but they were “temporary”, they showed up upon first connection, but immediately “broke”. Most things, however, seemed connected just fine… But several of them didn’t work. And then, when I powered the Pi on, some sort of smoke wisped up from a particular solder joint!

So I depowered it, took out the magnifying glass and my nose. The Pi4 seemed fine and didn’t smell like any magic smoke had been released. So I tried again, and got the same result, and then depowered and looked again. The only thing I can think of that’s smoking is maybe solder flux that’s contaminated a plug, or a dirty solder (long story)…

#DeepBreath

So, when the tool arrives, I’ll be desoldering this again, and starting again…

#OnlyForward.

EbikeE, version 1

EbikeE Electric bikeE Recumbent.

After many, many years, presenting the EbikeE!

20ish years ago my Mom got me a new bike, one I’d never heard of before, a red bikeE CT recumbent. Once I got the bite for ‘bents I haven’t enjoyed riding safety-bikes (the now-traditional upright-type of bike) since!

After getting to know a west-coast friend named CoffeeLuke, who has had various types of electric-assist bicycle over the years, around the year 2008ish I bought an early electric assist hub motor kit from Grin Technologies. I can’t remember the type of kit I bought, it was probably on the sale shelf, but it was never quite reliable enough. I’d have power drops at needed times, and generally jerky control.

So I shelved the project.

Then Covid happened. Getting to work on transit is sub-optimal, especially when I’m trying to limit my exposure due to susceptible people around me and we already have a high exposure person in the family.

So I got back in contact with Grin and we started to debug the issue, whether it was the motor itself, the controller, the batteries or the analyst. It was determined to be a lemon controller, and I purchased a new replacement Phaserunner MT.

Current tests are ongoing, 2 full commutes have been completed and learning has happened on both. Some bruises are healing. But we’re pretty close to getting everything dialed in and near perfect!

Next up are the upgrades. So, so many upgrades! Feel free to suggest upgrades too!
… and the computer!

Me on the EbikeE V1
Me on the EbikeE V1.

Wii Nunchuk & Raspberry Pi 4

The Wii Nunchuk is an IIC/I2C/I2C UI device. It offers a 2-axis joystick, 2 buttons labelled C [the smaller, roundish one on top] and Z [the larger, squarer one on the bottom], and a 3-axis accelerometersthat measures the position of the device in 3 dimensions.

I’ve always thought it would be fun to use one as an input device on the RPi, and I’m not alone in that. There are many examples of python implementations using the nunchuk, but apparently only one that turns it into a general Linux uinput device: https://github.com/xerpi/nunchuk2pi

I first just tried cloneing the repository and compiling it, but it wouldn’t work. Some basic research led to some other software having similar issues due to a change in header file layout as well as deprecated inline functions between versions of uinput.

So I gave up at the time.

But my brain wouldn’t leave it. So I poked at one issue, and prodded at another, and eventually found all the pieces I needed to put the puzzle together! I haven’t written C of any kind for a while, so this was an interesting stretching of those creaky muscles. I’m also using Tint2 as the panel on this desktop, so I wrote an executor that shows the status of the n2pi driver, and allows you to run it if it’s not already running.

So my I forked xerpi’s code and did mine up properly, so the other maybe 6 people in the world who cares about this stuff can find if if they want: https://github.com/scriven42/nunchuk2pi

Thanks for reading, and I hope everyone’s doing OK in these extended C19 times!

Worm Bin Construction!

I’ve been a fan of vermicomposting, or composting with worms, for many years. I can’t remember how I first heard about it, but one of the first non-internet sources I found was “Worms Eat My Garbage” by Mary Appelhof. I made a few worm bins, and dove in! There were many ups and downs, and I had stopped doing it for ages, but with the move to the new home and the bigger garden and patio, it seemed the perfect time to start again.

So I dug up my old bins, both Rubbermaid tub construction made from 37L and/or 53L roughneck totes.

Clean worm bins drying.
The various types of worm bin and lids, cleaned after their long storage.
Continue reading “Worm Bin Construction!”

VESA Smartphone Mount

VESA Phone Mount In-situ, rear

The phone, however small, seems to take up a lot of valuable desk real-estate. And also, when plugged into the correct adapter, it can use one of the HDMI monitors and become pretty much a 2nd computer. It seems these two hands should meet and become friends.

We already had plans to test the phones as secondary “desktop” devices, so we bought one of the USBC docking stations: HDMI, 3xUSB3, multi-card reader and charging capabilities.

Next came the question of: How to mount it.

Continue reading “VESA Smartphone Mount”

Pegboard Garden Tool Storage

Got a bit bored and wanted to both use up some of the scraps as well as create some place for the garden tools to be more accessible.

So I cut a piece of leftover pegboard I had laying around (it was 4′ [feet] long and about 17″ [inches] wide) into 2, 2′ wide pieces. The top one I cut a peak into for the roof line, and then I put them together by screwing them both to 2 small pieces of scrap 2×6 board from the box.

I screwed 6 more of the scraps to the top for the top, middle and bottom segments of the roof. There where holes in between each segment, and the very peak was uncovered as well.

To cover it while making it accessible, I took leftover strips of pond liner from the Planter Project and stapled them, overlapping as best I can from bottom to top, onto the roof segments. I’ve kept them connected on the bottom still to stop them from blowing around in the wind, but I will probably end up trimming them slightly longer than the board and then attaching them to each other (and the board at the bottom corners) with fishing line or string.

Finally 3 metal clothes hangers were duct-taped and stapled to the back of the structure, which was then hung on the fence on the south side of our patio.

The next transfer of stuff from Brian’s to my [Adam’s] house will include pegboard stuff so I can mount the tools, broom and garden hose inside. My kids reminded me they had some pegboard stuff, so we had enough!

Tools hung on in pegboard tool storage unit.

August 2020 update: The protection from the unrelenting rain was inadequate, and the unit slowly melted and ultimately had to be discarded. 🙁 Back to the drawing board!

Planter Project

The recent calls to shelter-in-place and maintain social distance to attempt to spread out the Covid-19 pandemic happen to have corresponded with my [Adam] children’s spring break from school, so it turns out the whole family was home! This, along with our still getting comfortable with our now 3-generation family and new townhouse, resulted in this week-long project to expand the available gardening space.

Taking inspiration from this Self-watering raised bed design, combining it with our need for neater storage in the back yard, leads to the 2 planter boxes you see in the main picture.

Continue reading “Planter Project”

Single Board Computer User Interface (SBC-UI) Update!

SBC-UI is a piece of software I’ve been working on and using for a while. As it sounds, it presents the user interface and controls the single board computers (mainly Raspberry Pi‘s) that we use around here. Right now it’s just a command-line script that can be setup to start on boot.

We want the UI to be as simple as possible while still doing the job. As the SBC’s we’ve been focusing on first are mostly camera platforms, the UI currently consists of a single button for interaction and an LED for feedback. Configuration for each system is done via INI file.

This has worked fine for testing, the button toggles the condition of the SBC’s configured job, the LED shows whether that job is currently being performed or not. But what if the system is, say, an RPi Zero W, that doesn’t have any pins installed by default.

That led to the most recent functionality updates today, which was Linux signal process interaction. So on the systems that have no button, I merely send the program the USR1 signal in the system, and it acts as if a button was just released.

So now on the Zero W and other systems with no wired buttons it’s easier to control the UI, and this is also accessible to other programs.

The creation of the INI file is done by Ansible, but that’s another post…

December 2019 Software Updates

There is also [today’s other post being the previous one about the kit build] progress on several software fronts, specifically the small-board-computer (SBC) control, camera capture and rebroadcast.

We’ve got a central script on each SBC (currently all raspberry pi’s) that reads that computer’s configuration file and acts appropriately. It initially starts the chosen camera and streams it for framing purposes. When it is triggered (currently by button but eventually by interrupt signal in software as well) that framing is finished, it starts the main loop, either starting it’s job immediately or waiting for another trigger, as configured.

That software currently has 2 jobs, save a series of timelapse photos, or start recording video, both to the machine’s configured local storage disk.

We concentrated on local save first because testing of network stream quality of these cameras was, shall we say, not what the internet had led us to believe. For a long time we trusted our testing methods and didn’t question them at all, this was just how it was going to be.

Then I got fiddling around with streams and remote save, so I could just stream something and save it to the fileserver, for instance. And low-and-behold, the saved file didn’t have _any_ of the issues of the same direct stream!! What??

So, further testing has improved our thinking somewhat on streaming of the SBC cameras. We are focusing on purpose on HD video whenever possible, so the Raspberry Pi ZeroW is going to stay Timelapse only, and we’re not sure about wireless streaming quality still, those tests are ongoing.

BUT, all this streaming testing got tedious on the server, which led me to write a general stream capture script that immediately got more useful than intended! So now it has a list of pre-programmed streams and their necessary settings, and you can either save, re-broadcast or both for any chosen stream. Currently rebroadcasting has only been tested via the internal RTMP server, but it’s worked well enough to continue.

Only Forward! 🙂